This excerpted from GavinFDavies’ excellent post,
”New Hagon Rear Shocks Jacked Up And Centre Stand Mod”. See link to full post below.
Rear suspension:
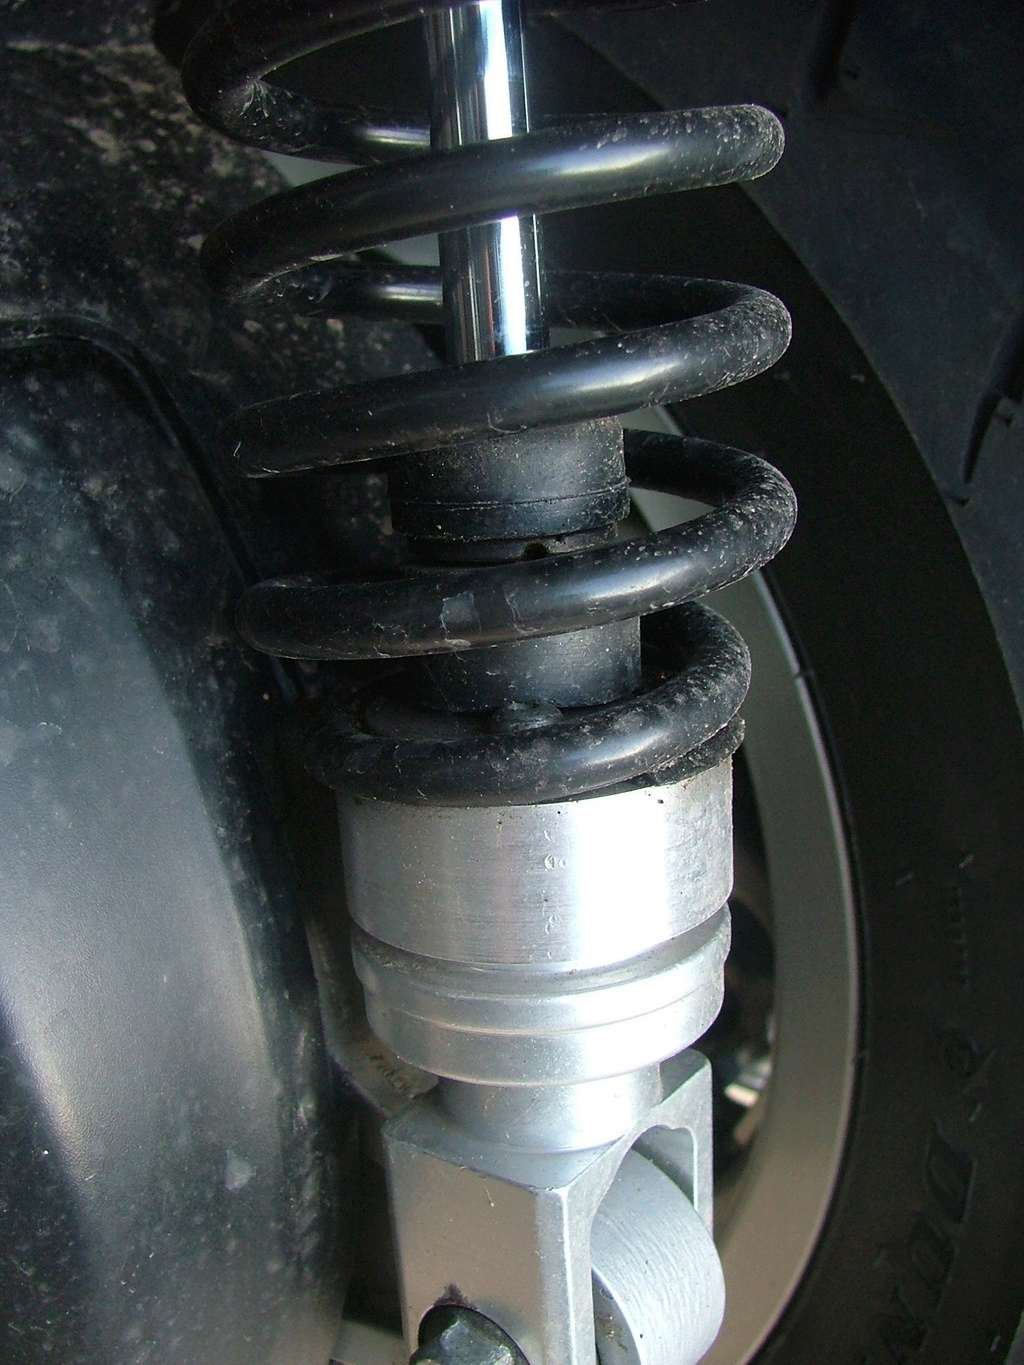
I looked at various options: Hagons (cheap, local, but 3-step preload only), Ikons (mid priced, but some more adjustments), and Wilbers I think (full price, full adjustment). But following a chat with Dave Bulwell at Hagon (he's sound, a great guy), I opted to go with Hagon. Again. I've used custom shocks from them twice before, so opted for reliability over fancy features. Dave explained that the Swing shocks were the longest by far of any they made, and as a result custom length were not an option since everything was bespoke to the Swing. Damper, spring, bottom clevis mount. All bespoke. Having bounced some ideas around, we agreed that while a new clevis would be a elegant solution, it was too costly for an unproven idea. So we decided to let me bodge a pair of stock items! The next morning the Hagons arrived at home for me to play with.
Normal length Hagons:
I had done some sag testing with the stock shocks, and repeated it with the Hagons. Recall that my bike was low miles, so the stock shocks can hardly be considered worn out (4,000 miles). I won't bore you all more with all the figures, but the bike sagged about 1.5" when the weight came off the centre stand on onto the back wheel (this excludes the air gap under the wheel), and sagged about a further 1.5" with me sat on it, to give a total over 3". Changing to the Hagons, that total sag with the rider dropped to 2", maybe a tiny bit less. So that was a 1" increase in rear ride height just from the stiffer springs and correct pre-load.
Jacked up Hagons:
I then opted to strip the shocks down, and implement my cunning plan. The springs were compressed using 6 big cable ties each to give me enough space to slip the retainers out and disassemble the unit. The next step was to unscrew the alloy clevis from the damper rod. Dave had explained it was simply loctited on, so first I tried immersing the clevis (not the damper!) in boiling water. No joy. Next I gently clamped the damper is a wooden work bench and began heating the alloy with the trusty blow torch. To warn me if I was over heating the alloy, I place a snip of solder on the clevis. If that melted, I'd know I was getting too hot (170deg C) for the alloy. It didn't melt. Eventually the Loctite (blue it turned out) softened enough to allow the clevis to unscrew. After cleaning the cleaning the threads, I set about the mods. The aim was to allow the shocks to be returned to normal later if desired.

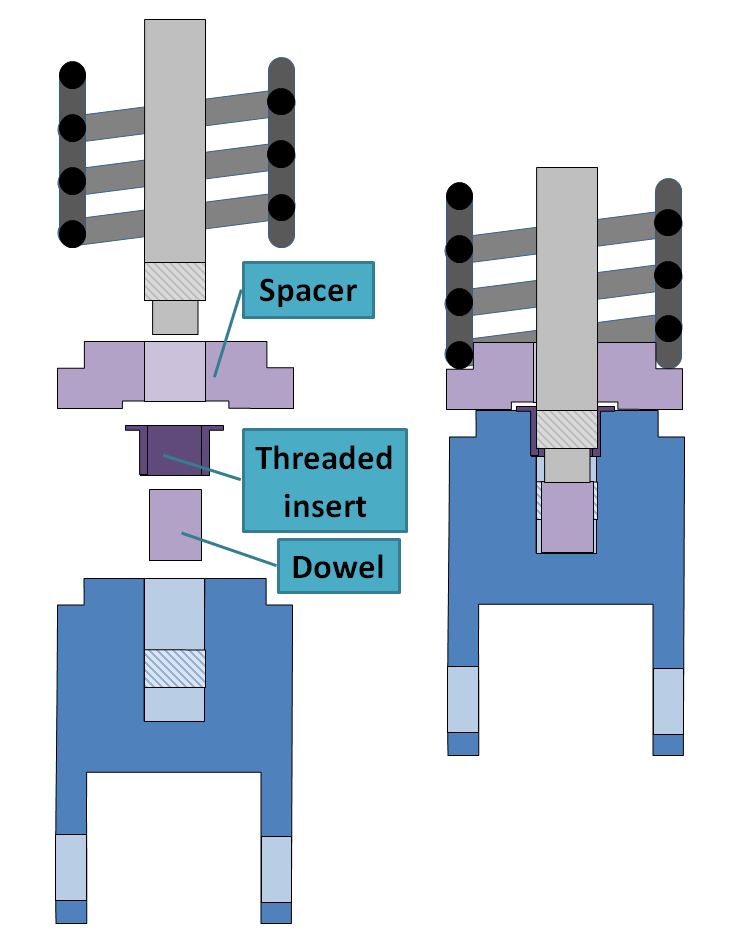
As can be seen, the rod sits in the clevis hole, and is retained by a threaded section midway down the hole, which is about 35mm deep in total. The insertion depth is set by the rod bottoming out, with the end of the rod necked down to a) clear the threads and b) ensure that it sits fit, not on any radius edge at the base of the hole. I opted to increase the length by inserting a 22mm steel dowel. I think that I used the smoother shank of an old 10mm drill bit trimmed to length on the angle grinder. It was few months back now! But this would mean that the threads wouldn't meet. So I purchased some M12 fine thread inserts to fit to the top of the clevis. By luck these are common for repairing diesel injector holes, hence kits were cheap. I got two kits on special offer complete with special taps for £1.75 including post! Or something like that. The special dies cut their own hole and then tapped it for the insert. I filed two opposite flats on the flange of the inserts to ease removal later if needed. The inserts would be loctited in place, and then the rods loctited into them, while sitting on top of the dowels. This would give about 10mm of thread engagement (compared to 15mm as originally built), but since the shock would only be in tension if I were to jump the bike (!) I reasoned that this would not be an issue.

But this left the issue of spring preload. Or lack of. Or even spring contact. Or lack of! I made up an alloy spacer the same 22mm thickness as the dowels, in order to return the preload to the original Hagon setting. There was a 13mm clearance hole for the rod, a rebate to clear the flange of the thread insert, and a step on the top to locate the spring. Now, the picture shows a one piece unit, which is what I would have like to have made. If only. I don't own a lathe, but the maintenance boys at work have a basic one with a few tips. So I took an hour to two of 'personal development time' to use make use of it (ok, I skived off work!). But with limited tools, I was only able to turn up the main discs, without the rebate, without the hole, and without the step. Nor material to make the step so it seems. But they were the right thickness (22mm) and the right diameter to match the clevis (47mm I think). At home I drilled the centre hole, and used a flat wood bit (!) to cut the rebate on my bench drill. I then made the step. This would be from a separate disc with centre hole, which would be bolted down onto the main space body. But I didn't have any 5mm allow sheet. What I had was 1/2" plate. Sigh. So I cut out the right size disc with a hole saw, locked it onto a long bolt with a couple of jam nuts, then literally chucked it in the bench drill. I turned it to final size to fit inside the spring using a file pressed against it. I then split it in half in plane using a hack sack while the disc span in the drill. I know, I know, but means must when the devil drives so they say. The result was two discs 5mm thick, with a central hole 13mm, and an out diameter to fit inside the spring. The last task was to drill a small 5mm hole in the step disc, then mount it onto the spacer disc on the rod, and mark where the hole was on the spacer disc. This was then drilled and tapped M5 to take a small button-head bolt to hold the two discs together. Since its only job is to centrally locate the spring, and the discs themselves are located by the rod, that one bolt is sufficient since all it does it stop the step disc falling off! If you look closely at the pic you might spot the little bolt inside the spring!
Phew. Not ideal, but where there's a will (but not a fully equipped lathe) there's a way.

While I had the shock apart, I opted to polish up and lube the mating and moving faces of the spring and preload adjustment collate, to make it easier to turn. The collar is a zinc casting and has a few burrs and edges than respond well to being rounded off.
After assembly, everything looked good, and left me with about 5mm clearance between the tyre and the floor when on the stand. It's a new tyre, so this gap should only increase when it wears.
Fitting note:
When fitting/removing the shocks, it is in fact possible to access the top bolt without stripping off the panels or drilling holes in the luggage compartment. A ring spanner with an offset head can just about get up there and do the business. That said, once you've done it once, removing the side panels isn't difficult. Remove the rear rack (4x bolts), remove the little panel between the licence plate and the stop lamp (2 screws), remove the screws from the side panels (two on the right, three on the left). Pull out on the bottom of the panel to clear the lugs from their holes, the lift the top of the panel up out of its slits in the edge of the luggage compartment. I find getting pulling with a finger in the holes left by the front of the rear rack helps get this last bit going. For the left panel disconnect the seat lock cable if you want to move the panel away from the bike.
Result:
Firstly, the bike is a doddle to get on and off the stand, since now it sits most of the way to the top as it were. Just need to exercise a little common sense when parking on slopes. It won't roll off on it's own, but it might if some nonce bumped into it. But this is hardly different to other bikes, or to use of the kick stand for that matter.
Secondly, the firm rear suspension improves the ride a lot. It doesn't wallow or bounce along. Preload is easy to adjust too.
Thirdly, the steering is GREATLY improved. While there still is that tendency to flop into tight turns, the forces involved are much less. This is because the rear end is higher, hence the fork angle is steep, hence that rearward offset of the wheel contact patch relative to the point the actual fork angle points to is also less. Now those steering forces are on par or less than the usual steering forces, hence it doesn't catch me out. I find I can do tight turns easily without feeling like the bike is trying to yank the bars around. To my mind it now handles like a heavy classic motorcycle (Ninja 900 maybe?) rather than some raked out cruiser made for show and not for corners.
Conclusion:
The firmer and taller rear suspension improves the ride and handling which makes the bike easier and more pleasant to ride. This does require some mods to the lower end of the shocks, but a simple change to the clevis design (a 22mm stretch between the bolt eyes at the bottom and the bottom of the rod hole) would make this a factory option from Hagon. This mod does though require a reversible mode to the centre stand. For home builders I would recommend adhesive wheel weights, but for Hagon I would use my method, but with some properly pressed steel U clamps.
https://www.silverwing600.com/t10465-new-hagon-rear-shocks-jacked-up-and-centre-stand-mod#106322