Edited 2-8-10 PLEASE READ THE NEW INFORMATIONHi All,
I put in some wrong info when I posted this the first time. The 2
screws I took pictures of are not the "idle
adjustment" but fuel mixture adjustments. The Idle
Adjustment Screw is in between the "2
screws" but forward about 2". Please see the pic below that I'm posting with this.

If you look throught this hole you will see the idle screw in the location of the front circle in the picture above. When I was reading the manual of where the idle screw was, it said to look through this hole and you will see the screw. Well when I did that these are the only
screws I saw so I thought that these were the idle
screws. Well I found out that they are for the mixture and not idle. It just so happens to have adjusted the idle rpm's because I was adjusting the mixture. I think when I adjusted mine I made it run "richer" . I thought I was smelling fuel but haven't had the chance to ride it a lot due to the rain.
But I went out today and let if warm up good and then I put the
screws back to where they were, or as close as I thought they were. I remember I turned each screw about 3/4 of a turn. So I turned them back to where they were before and then I saw the Idle screw and raised my idle. It does seem to run/idle a bit better. I also noticed my gas mileage went down a few miles per gallon, after the first time I adjusted the idle, so maybe that is why.
I want to apologize for the wrong information. When I went out the first time and looked down, the 2
screws were the only
screws I saw. But after finding out that these weren't the idle
screws I went back out and played around and found it. What happened was that a rubber hose was inbetween the hole and the idle screw and it was blocking me from seeing it. So I gently pushed it over and saw the screw.
The "Idle Screw" is silver and can be adjusted with a phillips or standard screwdriver. The 2
screws that I thought were the idle
screws are "Copper" looking. So if you went by my instructions please go out and re-do what you did. I hope you can remember about how much you turned the 2
screws. You can then adjust the idle with properly.
Again, I apologize and hope you can put it back to normal.
Thanks,
JeffR
Hi,
I went out and adjusted my idle today and thought I would take 2 pictures to show what I did. I consulted the manual to find the idle adjuster
screws. There are 2 of them.

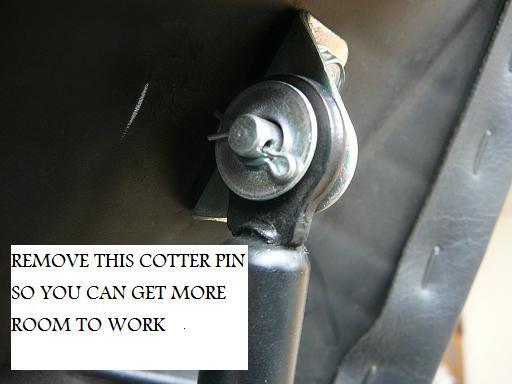
The picture above just shows the cotter pin on the "shock" that holds the seat up. Just remove the Cotter Pin so you can remove the "shock" from the top bracket. This will allow you to push the seat up farther to get more room to work. It is very easy but be careful since it could fly somewhere and you could lose it, or it could fall down one of the openings inside the SWing.

You will see 2 Idle
Adjustment screws, I have circles around them in the above picture, that need to be turned. I turned each one the same amount or at least as close as possible. I turned these "Counter-Clockwise" to raise the idle rpm's. My rpm's were about 1,000-1,100 when fully warmed up and when I tried to start the bike after it was running I had to give it throttle to keep it running. So I put it up to 1,300-1,400 rpm's and it seems a bit smoother at idle now.
I used the manual to find these
screws and they were really the only ones I could find so I assume they are the idle adjusters, since everything worked good and did exactly what I wanted. It is probably the easiest
adjustment to do on the SWing, which is why there are only 2 pictures.
