| | Driven Pulley Assembly Rebuild |  |
|
+6zrx212 Mech 1 twa Loosemarbles model28a Cosmic_Jumper Dimond 10 posters |
| Author | Message |
|---|
Dimond
Silver Wing Expert


Number of posts : 540
Age : 79
Location : San Francisco Bay Area
Points : 5532
Registration date : 2011-08-07
 |  Subject: Driven Pulley Assembly Rebuild Subject: Driven Pulley Assembly Rebuild  Fri Sep 26, 2014 11:06 am Fri Sep 26, 2014 11:06 am | |
| Driven Pulley Assembly Rebuild
09252014 rev 0
I have about 60,000 miles on my 2008 Swing ABS and so far have done all of my own maintenance. Recently I experienced some slippage in the Drive-Driven Pulley Ensemble that prompted a maintenance inspection that discovered a SEAL COLLAR failure. This write up covers my repairs so that others can be alerted to this ‘rare’ event in case they should experience a similar problem. Should the Movable Driven Face (pulley) bind, as mine did, it will cause belt slippage as there will be little (or no) compression by the spring located on the driven pulley onto the belt – hence the belt will slip under load.
Driven Pulley Rebuild (1.5MB file)
https://drive.google.com/file/d/0B7hlZFXiymXkNGtGWUpFVEZGcWM/view?usp=sharing
NOTE: I will update document in a few days to (attempt to) address any questions or suggestions that forum members may have. |
|
  | |
Cosmic_Jumper
Site Admin

Number of posts : 4415
Age : 81
Location : damn near Philadelphia, PA
Points : 10744
Registration date : 2009-06-12
 |  Subject: Re: Driven Pulley Assembly Rebuild Subject: Re: Driven Pulley Assembly Rebuild  Fri Sep 26, 2014 5:40 pm Fri Sep 26, 2014 5:40 pm | |
| WOW!! Thanks so much for your excellent Driven Pulley rebuild tutorial, photos and parts list. I'll be copying all of that and filing it in my Service Manual. Seems to me that there is a YouTube video via the Silverwing club of Italy, SWCI, wherein the legendary 'Steven B' goes through a similar procedure. As usual he makes it look easy peasy. Now with your tutorial I'll know what he's talking about.
Thanks again for the great info
Tim |
|
  | |
Cosmic_Jumper
Site Admin

Number of posts : 4415
Age : 81
Location : damn near Philadelphia, PA
Points : 10744
Registration date : 2009-06-12
 |  Subject: Re: Driven Pulley Assembly Rebuild Subject: Re: Driven Pulley Assembly Rebuild  Sat Sep 27, 2014 10:40 am Sat Sep 27, 2014 10:40 am | |
| Here's the link for that SWCI video for disassembly/reassembly of the Driven Pulley assembly:
http://m.youtube.com/watch?v=82MUIwzfCPo |
|
  | |
Cosmic_Jumper
Site Admin

Number of posts : 4415
Age : 81
Location : damn near Philadelphia, PA
Points : 10744
Registration date : 2009-06-12
 |  Subject: Re: Driven Pulley Assembly Rebuild Subject: Re: Driven Pulley Assembly Rebuild  Sat Sep 27, 2014 11:32 am Sat Sep 27, 2014 11:32 am | |
| Just to thoroughly confuse the matter here are two Ukraine videos showing removal and reinstallation of the clutch using the same basic tool:
http://m.youtube.com/watch?v=3kobgwV91jk
http://m.youtube.com/watch?v=7YnYzOgB8kE
Dunno if this is a Honda sourced tool or a machinist's one-off.
Tim |
|
  | |
Cosmic_Jumper
Site Admin

Number of posts : 4415
Age : 81
Location : damn near Philadelphia, PA
Points : 10744
Registration date : 2009-06-12
 |  Subject: Re: Driven Pulley Assembly Rebuild Subject: Re: Driven Pulley Assembly Rebuild  Tue Sep 30, 2014 10:35 am Tue Sep 30, 2014 10:35 am | |
| Re-reading your 'Driven Pulley Assembly Rebuild' tutorial again I do have one question: How would you remove that needle bearing? I assume that the ball bearing can be chased out with a long drift punch once the retainer snap ring is removed.
Tim |
|
  | |
Dimond
Silver Wing Expert


Number of posts : 540
Age : 79
Location : San Francisco Bay Area
Points : 5532
Registration date : 2011-08-07
 |  Subject: Re: Driven Pulley Assembly Rebuild Subject: Re: Driven Pulley Assembly Rebuild  Tue Sep 30, 2014 5:54 pm Tue Sep 30, 2014 5:54 pm | |
| - Cosmic_Jumper wrote:
- Re-reading your 'Driven Pulley Assembly Rebuild' tutorial again I do have one question: How would you remove that needle bearing? I assume that the ball bearing can be chased out with a long drift punch once the retainer snap ring is removed.
Tim Not sure exactly - but I have seen on Goldwing forums where folks have welded a tab on a rod and used a grinder to make a tool that could could be used as a long punch and to get a purchase on the bearing. I am open to ideas? Has anyone removed their needle bearing? |
|
  | |
model28a
Silver Wing Guru


Number of posts : 2085
Age : 71
Location : St.Pete.FL.
Points : 7557
Registration date : 2010-02-03
 |  Subject: Re: Driven Pulley Assembly Rebuild Subject: Re: Driven Pulley Assembly Rebuild  Tue Sep 30, 2014 9:57 pm Tue Sep 30, 2014 9:57 pm | |
| Tim I walked in on someone trying to get that snap ring out and he was at the cussing and pulling out hair part of the job. I found a long pair of needle nosed pliers and ground the tips to a little hook small enough to fit in the holes in the snap ring and it worked great. I've never seen a pair of snap ring pliers long enough to reach that deep. |
|
  | |
Loosemarbles
Site Admin

Number of posts : 1607
Age : 63
Location : South East England
Points : 4756
Registration date : 2016-10-01
 |  Subject: Re: Driven Pulley Assembly Rebuild Subject: Re: Driven Pulley Assembly Rebuild  Sat Jun 23, 2018 1:07 pm Sat Jun 23, 2018 1:07 pm | |
| Hello all,
I want to completely dismantle my driven pulley assembly and I too wonder how to remove the two bearings, i.e. the needle bearing and the ball bearing. I guess the ball bearing could be drifted out but when I tried it briefly, it didn't feel like it was going to move. I can't see that snap ring that is mentioned above. Has anyone removed these bearings without special tools?
BTW, is this forum back online? |
|
  | |
Cosmic_Jumper
Site Admin

Number of posts : 4415
Age : 81
Location : damn near Philadelphia, PA
Points : 10744
Registration date : 2009-06-12
 |  Subject: Re: Driven Pulley Assembly Rebuild Subject: Re: Driven Pulley Assembly Rebuild  Sat Jun 23, 2018 6:10 pm Sat Jun 23, 2018 6:10 pm | |
| Yes, the forum is back and open to new members.
Regarding Driven Pulley rebuilding; you'll need to use a heat gun on the DP base and then a 22-23mm expanding collet puller to remove the needle bearing. Though you could probably use a long drift inserted thru the roller bearing to drive the needle bearing out.
Then you'll need to grind down the tips on a long reach dual pivot needle nose pliers so that they will fit the snap ring. Once the snap ring is removed the ball bearing can be removed.
In all probability most repair shops just replace that DP half (23205-MCT-307) because it is cost effective as that DP half set comes with new bearings, snap ring and whatever special grease is called for.
Here's a link to that long reach dual pivot needle nose pliers:
https://www.ffx.co.uk/tools/product/Sealey-Ak8591-5054511120066-Needle-Nose-Pliers-Double-Joint-Long-Reach-335Mm
And a link to removing the needle bearing:
https://m.youtube.com/watch?v=M8KclLwsYo4
Tim |
|
  | |
Loosemarbles
Site Admin

Number of posts : 1607
Age : 63
Location : South East England
Points : 4756
Registration date : 2016-10-01
 |  Subject: Re: Driven Pulley Assembly Rebuild Subject: Re: Driven Pulley Assembly Rebuild  Sun Jun 24, 2018 11:11 am Sun Jun 24, 2018 11:11 am | |
| Thanks Tim, great news about the forum. Thanks for all that info, this is my kind of DIY bike fixing. I've ordered the pliers and I guess I'll try to drift the bearings out, I have a brass drift which will reach both ends.(I shudder to think of the cost of replacing the DP half), anyhow, I fancy a challenge ! I have a second hand assembly which I would like to refurbish and then put onto my SW. I also intend to overhaul the final drive gears etc. I only wish I had all the kit and gismos which that guy at SWCI has  This forum has become my lifeline and I am so chuffed that you and the guys are taking the time to uphold it. I am fascinated by the whole Silverwing design and powertrain assembly and I want to get to know this machine inside out......here's hoping ! |
|
  | |
Cosmic_Jumper
Site Admin

Number of posts : 4415
Age : 81
Location : damn near Philadelphia, PA
Points : 10744
Registration date : 2009-06-12
 |  Subject: Re: Driven Pulley Assembly Rebuild Subject: Re: Driven Pulley Assembly Rebuild  Sun Jun 24, 2018 2:36 pm Sun Jun 24, 2018 2:36 pm | |
| Here's a link to the DP break down. That DR half doesn't appear to be all that expensive from this source IMHO. But the shop charges would put the costs over the top.
https://www.partzilla.com/catalog/honda/scooter/2009/fsc600d-ac-silver-wing/driven-face
Stefano Bonacasa of SWCI has several good Silverwing servicing videos.
Good luck with your project. Please keep us advised how you get on with it. We all benefit from shared information. |
|
  | |
Loosemarbles
Site Admin

Number of posts : 1607
Age : 63
Location : South East England
Points : 4756
Registration date : 2016-10-01
 |  Subject: Re: Driven Pulley Assembly Rebuild Subject: Re: Driven Pulley Assembly Rebuild  Mon Jun 25, 2018 6:13 am Mon Jun 25, 2018 6:13 am | |
| Wow, fantastic stuff. I see what you mean about buying the whole assembly but I'll try the hard way first, drifting the bearings out will be my main obstacle. I was also hoping to find a 'cheat' to get the clutch bell off and on too without using special tools. I guess that's next.
Of course I'll keep the site posted on my progress. |
|
  | |
Cosmic_Jumper
Site Admin

Number of posts : 4415
Age : 81
Location : damn near Philadelphia, PA
Points : 10744
Registration date : 2009-06-12
 |  Subject: Re: Driven Pulley Assembly Rebuild Subject: Re: Driven Pulley Assembly Rebuild  Mon Jun 25, 2018 7:47 am Mon Jun 25, 2018 7:47 am | |
| - Loosebearing wrote:
- < Snip > I was also hoping to find a 'cheat' to get the clutch bell off and on too without using special tools. I guess that's next. < Snip >
That clutch bell thread is M40 x 1.0mm. Good luck finding something to fit. We have had folks here who've reported using long 4-armed pullers to remove the clutch bell. |
|
  | |
Loosemarbles
Site Admin

Number of posts : 1607
Age : 63
Location : South East England
Points : 4756
Registration date : 2016-10-01
 |  Subject: Re: Driven Pulley Assembly Rebuild Subject: Re: Driven Pulley Assembly Rebuild  Mon Jun 25, 2018 11:09 am Mon Jun 25, 2018 11:09 am | |
| Oh dear !
I've dismantled the pulley assembly, except removing the bearings, and discovered that the outer-half pulley is in a bad way. The guide apertures which allow the half-pulley to move outwards along the hub are 'bedded' and 'burred' but the seal collar is fine. Not sure how this could happen but there it is. Also, the belt faces of both pulley halves are pitted. I'll continue to remove the bearings just for practice in case I need to do it on my SW. I'll post my findings on this now that I can actually see that circlip which is hiding behind the ball bearing !
Meanwhile it's down to removing the clutch bell, the one on my SW is horribly scored. The pulley assembly episode has been a great lesson but it's over to a different subject for the clutch bell. Thanks for all your input, the knowledge is not wasted. |
|
  | |
Mech 1 twa
Silver Wing Guru


Number of posts : 1384
Location : Allentown PA.
Points : 4728
Registration date : 2016-01-02
 |  Subject: Re: Driven Pulley Assembly Rebuild Subject: Re: Driven Pulley Assembly Rebuild  Mon Jun 24, 2019 7:33 pm Mon Jun 24, 2019 7:33 pm | |
| I'm also having a problem in driving pulley. Grinding noise. One or both bearings noisy. Lubed inner last belt change but outer is difficult to lube and it was dry. Inner is a needle type outer is a caged ball bearing.
Pulled belt and could hear rumble just rotating it by hand. Pulled inner with a expanding type puller on a slide hammer came out without to much effort. Outer requires complete disassemble of pulley sliding pins -sheave assy. Ground down a long needle nose for snap ring then it drives out with a socket-extension. Waiting on parts for now.
Another problem is finding the special grease required. Searched for two hours and found Yamaha makes the proper stuff. $5 for 10oz tube Polyurea grease. Honda doesn't list anything and dealers are clueless. This grease in very liquid like not thick at all green in color. Yamaha grease is for T-Max and other ATVs should work fine they have similar pulley systems. Needle and roller I can use good wheel bearing type grease. I'll keep you posted once parts are here. |
|
  | |
Cosmic_Jumper
Site Admin

Number of posts : 4415
Age : 81
Location : damn near Philadelphia, PA
Points : 10744
Registration date : 2009-06-12
 |  Subject: Re: Driven Pulley Assembly Rebuild Subject: Re: Driven Pulley Assembly Rebuild  Mon Jun 24, 2019 11:27 pm Mon Jun 24, 2019 11:27 pm | |
| I'm anxious to hear how you get on with the DP rebuild.
What kind of tool did you use to remove that "C" ring? Regular needle nose pliers just wont reach that deep. Also curious how to "fill" the inside of the DP sheave with that special grease.
Tim |
|
  | |
Mech 1 twa
Silver Wing Guru


Number of posts : 1384
Location : Allentown PA.
Points : 4728
Registration date : 2016-01-02
 |  Subject: Re: Driven Pulley Assembly Rebuild Subject: Re: Driven Pulley Assembly Rebuild  Tue Jun 25, 2019 9:49 pm Tue Jun 25, 2019 9:49 pm | |
| I used a long dual pivot needle nose pliers to remove outer snap-ring.
Outer drive face has pocket in the pin area to fill with grease and two seals at each end.
Grease in there and slide back over inner face then grease pins-slots. Slide collar over that it has two O-rings to seal that. Clean up whatever is pushed out and should be good. Using a press at work to compress spring and reassemble. No parts yet.
Pressing that needle bearing is the part I'm worried about. |
|
  | |
Cosmic_Jumper
Site Admin

Number of posts : 4415
Age : 81
Location : damn near Philadelphia, PA
Points : 10744
Registration date : 2009-06-12
 |  Subject: Re: Driven Pulley Assembly Rebuild Subject: Re: Driven Pulley Assembly Rebuild  Wed Jun 26, 2019 8:04 pm Wed Jun 26, 2019 8:04 pm | |
| Any chance you could post a photo of the ground-down tips of your dual pivot needlenose pliers?
Tim |
|
  | |
Mech 1 twa
Silver Wing Guru


Number of posts : 1384
Location : Allentown PA.
Points : 4728
Registration date : 2016-01-02
 |  Subject: Re: Driven Pulley Assembly Rebuild Subject: Re: Driven Pulley Assembly Rebuild  Wed Jun 26, 2019 10:22 pm Wed Jun 26, 2019 10:22 pm | |
| 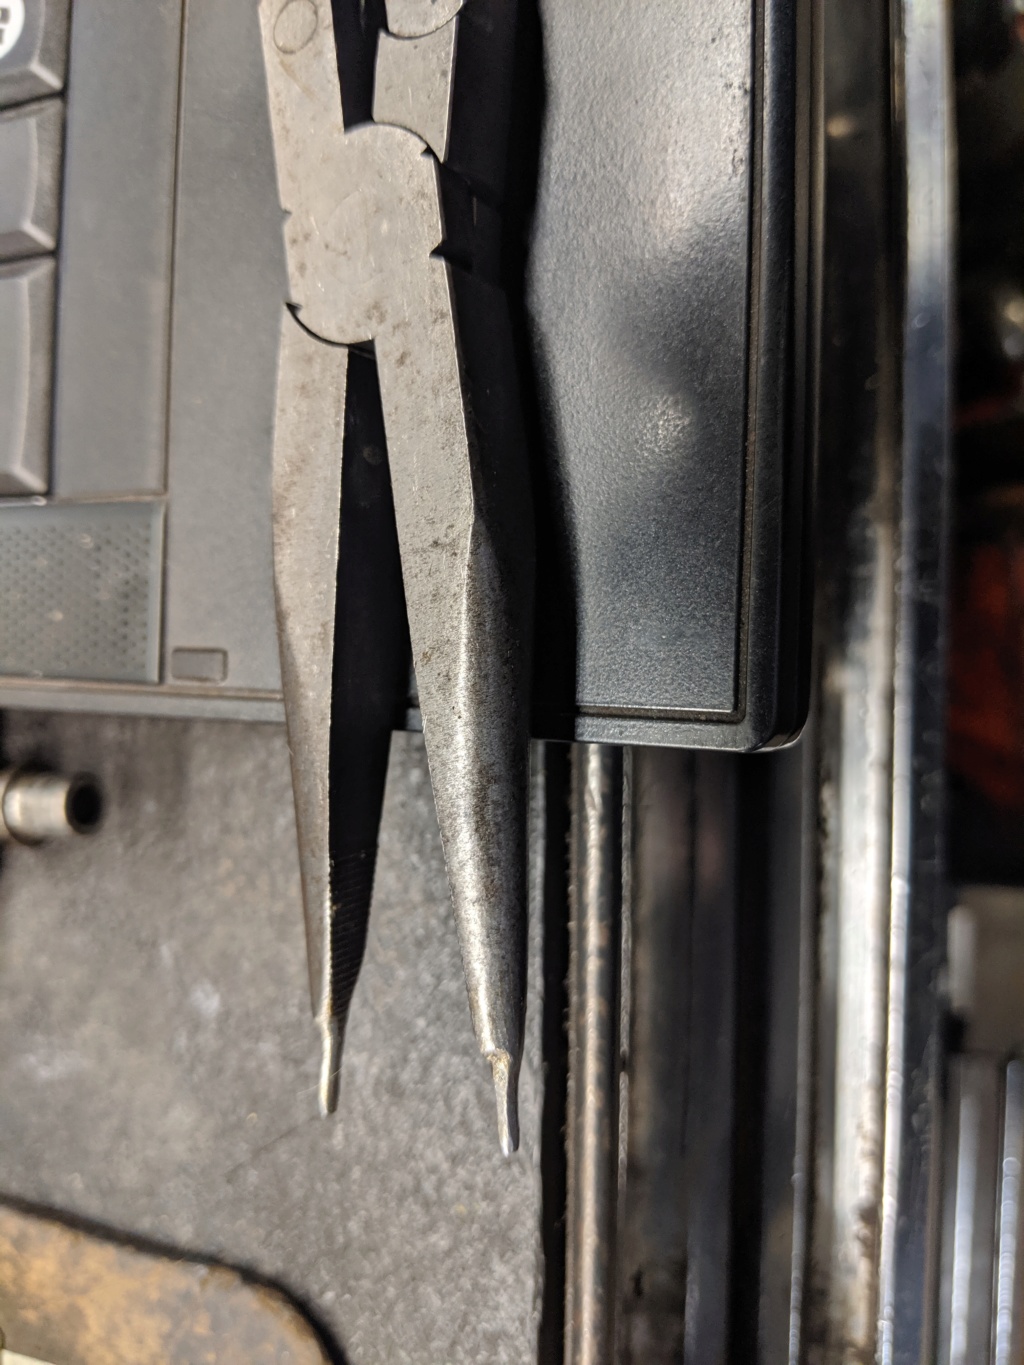 Ground tips with a 90 deg. grinder very abrasive pad. It's still not easy to remove snap ring. |
|
  | |
Mech 1 twa
Silver Wing Guru


Number of posts : 1384
Location : Allentown PA.
Points : 4728
Registration date : 2016-01-02
 |  Subject: Re: Driven Pulley Assembly Rebuild Subject: Re: Driven Pulley Assembly Rebuild  Wed Jun 26, 2019 10:28 pm Wed Jun 26, 2019 10:28 pm | |
| 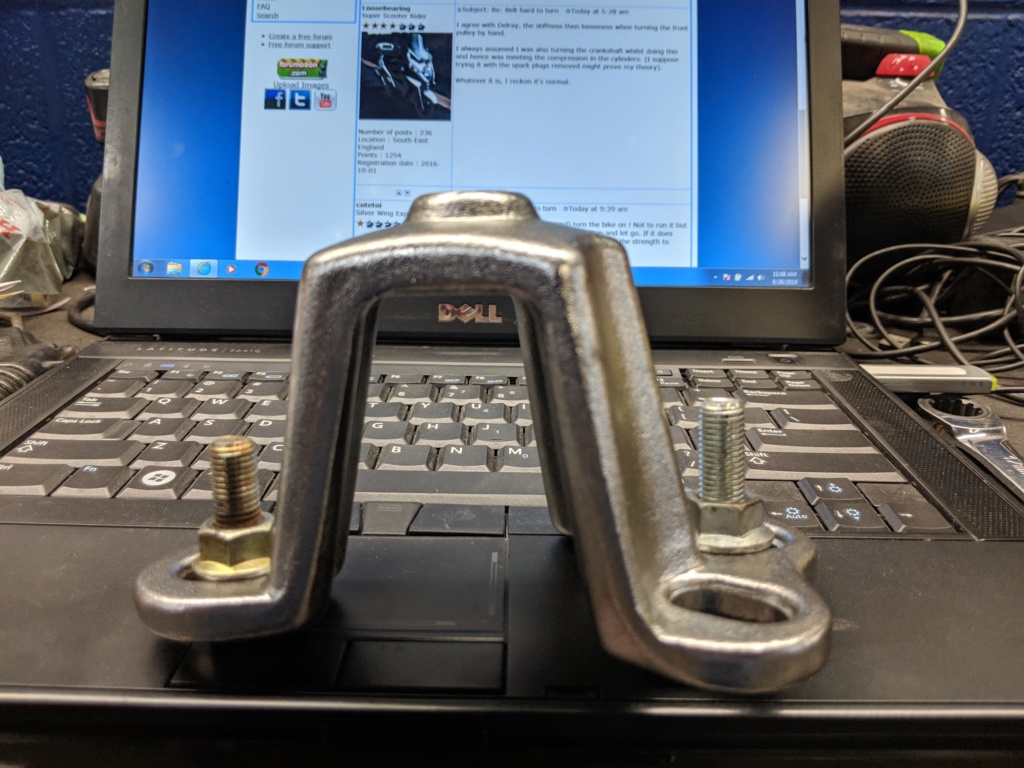 Used this hub puller with bolts added to keep it centered when compressing large spring. Used a large press but spring pressure is not that great a little overkill. |
|
  | |
Cosmic_Jumper
Site Admin

Number of posts : 4415
Age : 81
Location : damn near Philadelphia, PA
Points : 10744
Registration date : 2009-06-12
 |  Subject: Re: Driven Pulley Assembly Rebuild Subject: Re: Driven Pulley Assembly Rebuild  Thu Jun 27, 2019 7:51 am Thu Jun 27, 2019 7:51 am | |
| Thanks so much for the DIY tool photos. They'll be a big help to anyone wanting/needing to persue their own DP rebuild.
Tim |
|
  | |
Mech 1 twa
Silver Wing Guru


Number of posts : 1384
Location : Allentown PA.
Points : 4728
Registration date : 2016-01-02
 |  Subject: Re: Driven Pulley Assembly Rebuild Subject: Re: Driven Pulley Assembly Rebuild  Sat Jun 29, 2019 6:31 pm Sat Jun 29, 2019 6:31 pm | |
| SW is back together and went for a short ride all is good. No noise in rear pulley. I'll post some more photos at another time. Real test ride tomorrow weather is going to be great. |
|
  | |
Mech 1 twa
Silver Wing Guru


Number of posts : 1384
Location : Allentown PA.
Points : 4728
Registration date : 2016-01-02
 |  Subject: Re: Driven Pulley Assembly Rebuild Subject: Re: Driven Pulley Assembly Rebuild  Mon Jul 01, 2019 8:07 pm Mon Jul 01, 2019 8:07 pm | |
| 230 miles on Sunday everything working great. Photos  Puller to remove needle bearing. 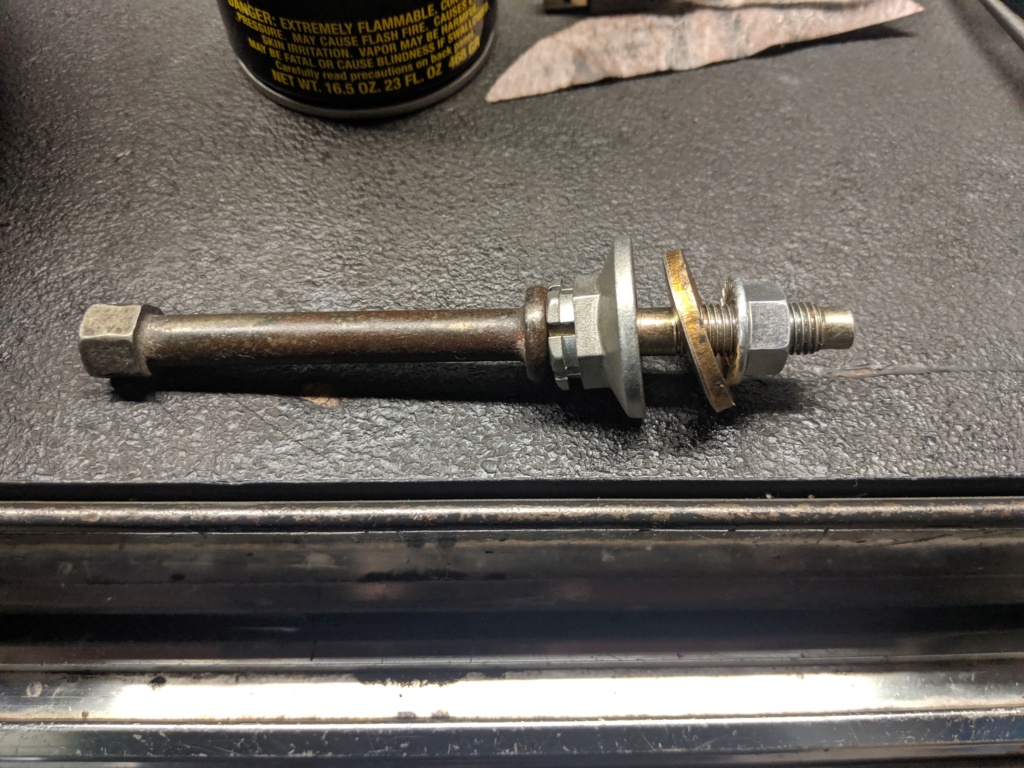 Tool I assembled to install outer bearing, it's a Honda starter bolt and other nuts.  Removed bearings 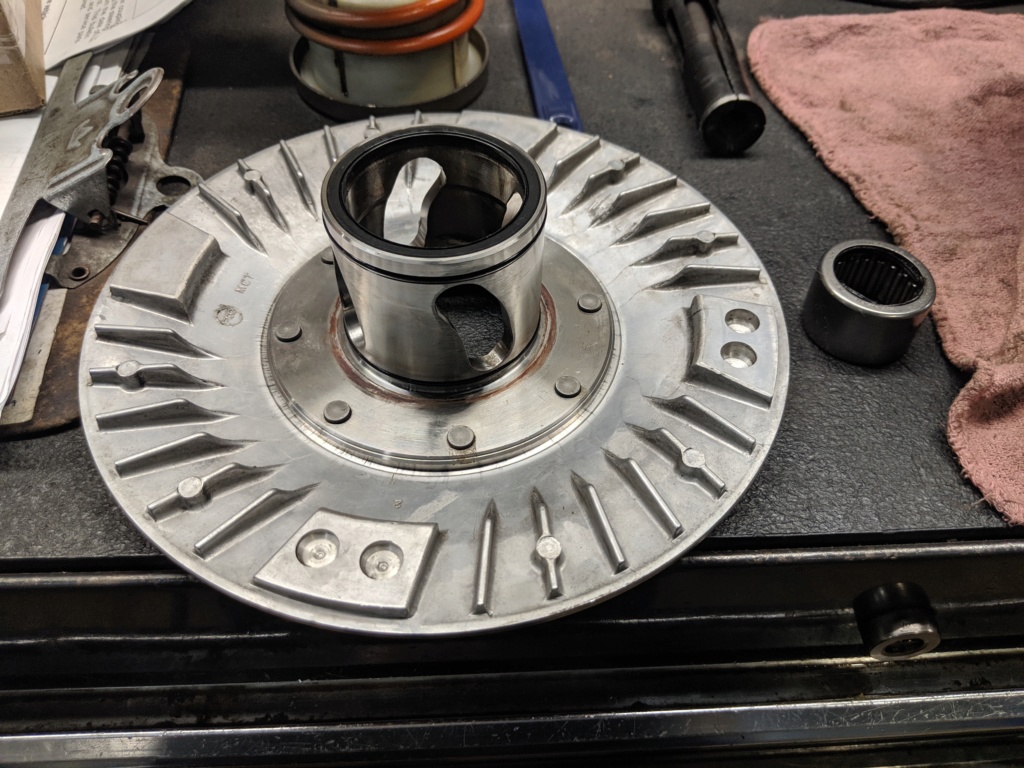 Outer Face  [/url Clutch shoes had metal embedded into surface used a pick to remove it. Very strange. 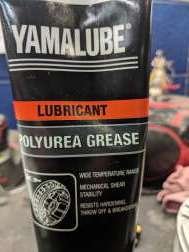 Grease   |
|
  | |
Loosemarbles
Site Admin

Number of posts : 1607
Age : 63
Location : South East England
Points : 4756
Registration date : 2016-10-01
 |  Subject: Re: Driven Pulley Assembly Rebuild Subject: Re: Driven Pulley Assembly Rebuild  Tue Jul 02, 2019 4:30 am Tue Jul 02, 2019 4:30 am | |
| Many thanks for the pics and info. Another useful addition to the forum's DIY catalogue  |
|
  | |
zrx212
Silver Wing Expert

Number of posts : 580
Age : 65
Location : Ocala, FL
Points : 2023
Registration date : 2020-12-26
 |  Subject: Re: Driven Pulley Assembly Rebuild Subject: Re: Driven Pulley Assembly Rebuild  Tue Mar 30, 2021 11:39 pm Tue Mar 30, 2021 11:39 pm | |
| Kinda new to this forum, a lot of good info here by th OP and others, I went thru a complete inspection, clean, lube and belt replacement of my 11k miles/2012, with SM on hand and lot's of experience on cvt's, no major wear noticed overall, did find some rub marks on inner surface of seal collar, from roller guide pins ?, IAC ordered a bunch of parts and going to restore cvt completely, just for peace of mind. Here's some random observations/comments based on OP's PDF and my experience, etc.
1. The needle bearing on the driven pulley has rubber seals to contain grease in bearing and cavity, reason why SSM 10-15 tells you orientation to install it.
2. The grease that turns to wax in driven pulley cavity is useless IMO, I use exclusively Polyurea based grease on all cvt components requiring lube, Lucas X-Tra Heavy Duty(green) or John Deere SD(green) are widely availble and cheaper than any oem stuff.
3. The reason Honda removes the inner seal on the outer bearing to presumably use the cavity grease to keep it lubed is simply "DUMB" IMO. most scooters use a sealed bearing ??, a double sealed ball bearing of this size is very common(60032RS) and the load on this application is very minimal compared to wheel bearings, a quality brand bearing will have long life grease, I will install one soon.
4. I use a drill press to compress big spring with similar wooden blocks as OP's PDF pic.
I will change both bearings, will try to post pics as I go along !! |
|
  | |
FrancoisJ
Scooter Rider


Number of posts : 31
Age : 74
Location : South Africa
Points : 1430
Registration date : 2021-02-11
 |  Subject: Re: Driven Pulley Assembly Rebuild Subject: Re: Driven Pulley Assembly Rebuild  Wed Mar 31, 2021 5:00 am Wed Mar 31, 2021 5:00 am | |
| - Cosmic_Jumper wrote:
- WOW!! Thanks so much for your excellent Driven Pulley rebuild tutorial, photos and parts list. I'll be copying all of that and filing it in my Service Manual. Seems to me that there is a YouTube video via the Silverwing club of Italy, SWCI, wherein the legendary 'Steven B' goes through a similar procedure. As usual he makes it look easy peasy. Now with your tutorial I'll know what he's talking about.
Thanks again for the great info
Tim I fully afree Cosmic Jumper! All I can say is ... Wow! |
|
  | |
Cosmic_Jumper
Site Admin

Number of posts : 4415
Age : 81
Location : damn near Philadelphia, PA
Points : 10744
Registration date : 2009-06-12
 |  Subject: Re: Driven Pulley Assembly Rebuild Subject: Re: Driven Pulley Assembly Rebuild  Wed Mar 31, 2021 8:46 am Wed Mar 31, 2021 8:46 am | |
| - zrx212 wrote:
- (Snip)
2. The grease that turns to wax in driven pulley cavity is useless IMO, I use exclusively Polyurea based grease on all cvt components requiring lube, Lucas X-Tra Heavy Duty(green) or John Deere SD(green) are widely availble and cheaper than any oem stuff.
3. The reason Honda removes the inner seal on the outer bearing to presumably use the cavity grease to keep it lubed is simply "DUMB" IMO. most scooters use a sealed bearing ??, a double sealed ball bearing of this size is very common(60032RS) and the load on this application is very minimal compared to wheel bearings, a quality brand bearing will have long life grease (Snip) Devil’s Advocate here: What would be the advantage of “Green” grease in the DP? Wouldn’t “upgrading” to a new grease be a moot point if also changing to a sealed bearing? I’ll be looking forward to you replacing that outer bearing. It’s a tedious job. |
|
  | |
zrx212
Silver Wing Expert

Number of posts : 580
Age : 65
Location : Ocala, FL
Points : 2023
Registration date : 2020-12-26
 |  Subject: Re: Driven Pulley Assembly Rebuild Subject: Re: Driven Pulley Assembly Rebuild  Wed Mar 31, 2021 11:02 am Wed Mar 31, 2021 11:02 am | |
| - Cosmic_Jumper wrote:
- zrx212 wrote:
- (Snip)
2. The grease that turns to wax in driven pulley cavity is useless IMO, I use exclusively Polyurea based grease on all cvt components requiring lube, Lucas X-Tra Heavy Duty(green) or John Deere SD(green) are widely availble and cheaper than any oem stuff.
3. The reason Honda removes the inner seal on the outer bearing to presumably use the cavity grease to keep it lubed is simply "DUMB" IMO. most scooters use a sealed bearing ??, a double sealed ball bearing of this size is very common(60032RS) and the load on this application is very minimal compared to wheel bearings, a quality brand bearing will have long life grease (Snip)
Devil’s Advocate here: What would be the advantage of “Green” grease in the DP? Wouldn’t “upgrading” to a new grease be a moot point if also changing to a sealed bearing?
I’ll be looking forward to you replacing that outer bearing. It’s a tedious job. PSA, just for clarity for all, green just happens to be the color of the 2 samples of polyurea grease I referenced(both made by Lucas) color does not define formulation of grease in general, not a industry standard, read label. Polyurea based grease is OEM for a lot of high performance atv's, these of the shelf samples are just cheaper and widely available. Ok, back on topic, yes installing a sealed bearing really negates the need for any grease in cavity IMO(sorry not correct see my later post), the needle bearing has seals to contain grease in it and the "rolled cup" design holds grease, just pack and forget, other areas like pin roller guides/grooves still need to be packed under seal collar. KIM(PSA) that the 2 bearings on the inner sheave are only spinning/working when clutch is disengaged/idle, past "clutch in" point, the heavy lifting "per se" is done by the gearbox and cvt cover bigger bearings. Yes installing those bearings could be a challenge, I have 2ea. on the way JIC, plus 35+ years of large aircraft maintenace helps(kinda explains me overstating things  ), I have a lot of capable tools, but I like to explore repair techniques that could be replicated by the average tinkerer !! WKYP, will try to post pic of needle bearing/seals  bearing bearing seals
Last edited by zrx212 on Thu Apr 01, 2021 4:06 pm; edited 1 time in total |
|
  | |
Cosmic_Jumper
Site Admin

Number of posts : 4415
Age : 81
Location : damn near Philadelphia, PA
Points : 10744
Registration date : 2009-06-12
 |  Subject: Re: Driven Pulley Assembly Rebuild Subject: Re: Driven Pulley Assembly Rebuild  Wed Mar 31, 2021 12:35 pm Wed Mar 31, 2021 12:35 pm | |
| So is that Lucas polyurea grease less likely to cake than the OEM grease? If so then it wouldn’t it be an advantage if using the non-sealed, 6003U, outer (roller) bearing? |
|
  | |
Mech 1 twa
Silver Wing Guru


Number of posts : 1384
Location : Allentown PA.
Points : 4728
Registration date : 2016-01-02
 |  Subject: Re: Driven Pulley Assembly Rebuild Subject: Re: Driven Pulley Assembly Rebuild  Wed Mar 31, 2021 6:12 pm Wed Mar 31, 2021 6:12 pm | |
| The coating of grease inside driven face is kind of a seal to keep grease in movable driven face. Guide roller pins protrude into it. Polyurea grease is high temp. stuff. Who knows just my theory anyway.  Double joint needle nose plyers are the only way to reach that snap ring. If I could have made them better try and grind some hooks at the end to bite better on snap ring. Inner needle bearing must be removed to replace outer one. |
|
  | |
zrx212
Silver Wing Expert

Number of posts : 580
Age : 65
Location : Ocala, FL
Points : 2023
Registration date : 2020-12-26
 |  Subject: Re: Driven Pulley Assembly Rebuild Subject: Re: Driven Pulley Assembly Rebuild  Wed Mar 31, 2021 11:21 pm Wed Mar 31, 2021 11:21 pm | |
| - Cosmic_Jumper wrote:
- So is that Lucas polyurea grease less likely to cake than the OEM grease? If so then it wouldn’t it be an advantage if using the non-sealed, 6003U, outer (roller) bearing?
Yes and Yes, the Lucas polyurea grease is superior in all aspects, especially in the drying out part, I've have used it a lot on other scooters without any issues. having personally used the lucas grease in the cavity and packing back of bearing best I could on the SW, it actually looked better on my next look as grease was still smooth and there was more in bearing. My best educated observation is that the lubrication of the outer bearing is kind of centrifugal force motivated and ability of grease to flow, not happening with dry grease ? IAC in new condition the Honda recomended lithium grease will have a thicker consistency than the Lucas. OK, there's a catch or detail(of course  ), you must removed/wash out old grease as best as possible, Polyurea is not compatible with lithium  any high flash solvent is good, no water or water based degreasers. |
|
  | |
Cosmic_Jumper
Site Admin

Number of posts : 4415
Age : 81
Location : damn near Philadelphia, PA
Points : 10744
Registration date : 2009-06-12
 |  Subject: Re: Driven Pulley Assembly Rebuild Subject: Re: Driven Pulley Assembly Rebuild  Thu Apr 01, 2021 10:21 am Thu Apr 01, 2021 10:21 am | |
| So how did you manage to pack the “tube” with Lucas grease? How did you manage to repack the outer bearing without removing it first? |
|
  | |
zrx212
Silver Wing Expert

Number of posts : 580
Age : 65
Location : Ocala, FL
Points : 2023
Registration date : 2020-12-26
 |  Subject: Re: Driven Pulley Assembly Rebuild Subject: Re: Driven Pulley Assembly Rebuild  Thu Apr 01, 2021 3:54 pm Thu Apr 01, 2021 3:54 pm | |
| - Cosmic_Jumper wrote:
- So how did you manage to pack the “tube” with Lucas grease? How did you manage to repack the outer bearing without removing it first?
Well, I'll quote myself "packing back of bearing best I could" I used a long wooden dowel to push grease into back of bearing from clutch end, rotating bearing occasionally to work grease in, after I filled cavity with grease gun, worked grease into sides with same dowel, lubed roller bearing, then I just slid/installed assy. on shaft and any excess was pushed out the nut end, wiped off excess, etc. etc. Manual 10-15 says 23-28gr(aprox. 1oz) not really a good way to determine exact amount ?? no real textbook procedure how to acomplish  The use of polyurea grease is strickly my personal choice, there's plenty of better quality than Honda oem lithium based/complex lubes out there, wich would not have a compatibility issue, just wipe old of and reapply, just make sure they are wheel bearing rated(GC). KIM that even with sealed bearing some amount of grease needs to be in cavity to supply movable sheave and roll pins JIC, kinda a backup. I know I'm contradicting my previous statement, but just noticed a hole /passage for grease. not present on the Majesty 400 for example. BTW that seal collar failure on the OP's bike and shown on this video https://youtu.be/pNbEUIm1L54is concerning, seen a few more videos on this, there is some slight wear marks on mine with just 11.5 k miles The use of polyurea grease is strickly my personal choice, there's plenty of better quality than Honda oem lithium based/complex lubes out there, wich would not have a compatibility issue, just wipe old of and reapply, just make sure they are wheel bearing rated(GC). KIM that even with sealed bearing some amount of grease needs to be in cavity to supply movable sheave and roll pins JIC, kinda a backup. I know I'm contradicting my previous statement, but just noticed a hole /passage for grease. not present on the Majesty 400 for example. BTW that seal collar failure on the OP's bike and shown on this video https://youtu.be/pNbEUIm1L54is concerning, seen a few more videos on this, there is some slight wear marks on mine with just 11.5 k miles  is very possibly related to that cheap Honda oem grease is very possibly related to that cheap Honda oem grease  , all getting replaced soon. |
|
  | |
zrx212
Silver Wing Expert

Number of posts : 580
Age : 65
Location : Ocala, FL
Points : 2023
Registration date : 2020-12-26
 |  Subject: Re: Driven Pulley Assembly Rebuild Subject: Re: Driven Pulley Assembly Rebuild  Fri Apr 02, 2021 11:22 pm Fri Apr 02, 2021 11:22 pm | |
| Got double seal bearing installed today, removed/knocked out old needle bearing with a 6in 3/8 extension and small hammer, thru center of small bearing, even random taps to keep it from jamming, small bearing easy to do, just snug fit, needle bearing used 1/2 in. 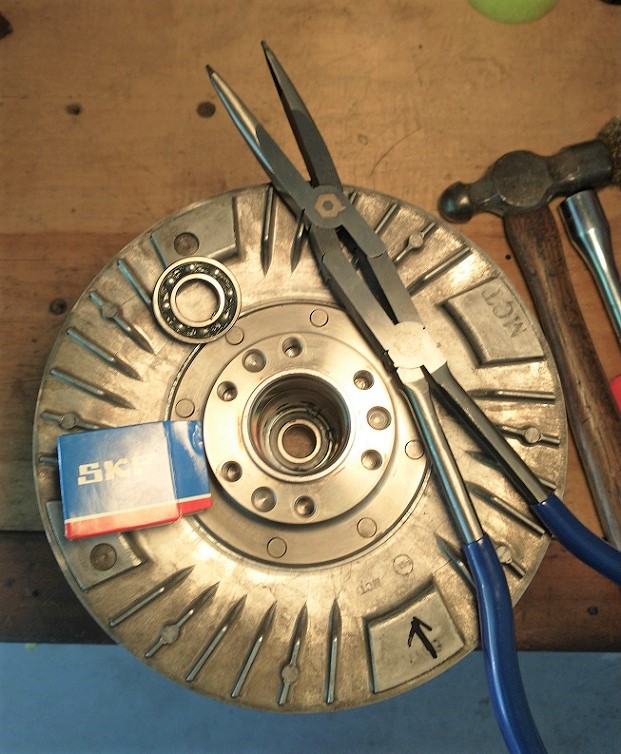 , used threaded rod, etc. to press in. ditto on pliers mod  |
|
  | |
oldwingguy
Silver Wing Guru

Number of posts : 1935
Location : Hocking Hills U.S.A.
Points : 5358
Registration date : 2016-01-29
 |  Subject: Re: Driven Pulley Assembly Rebuild Subject: Re: Driven Pulley Assembly Rebuild  Sat Apr 03, 2021 7:36 am Sat Apr 03, 2021 7:36 am | |
| Bearings, when I could I put the bearing in the freezer overnight, The next day I heated whatever hub then installed the bearing, most of the time no driving in needed at all just went into place EZ PEZZE. |
|
  | |
zrx212
Silver Wing Expert

Number of posts : 580
Age : 65
Location : Ocala, FL
Points : 2023
Registration date : 2020-12-26
 |  Subject: Re: Driven Pulley Assembly Rebuild Subject: Re: Driven Pulley Assembly Rebuild  Sat Apr 03, 2021 11:47 am Sat Apr 03, 2021 11:47 am | |
| 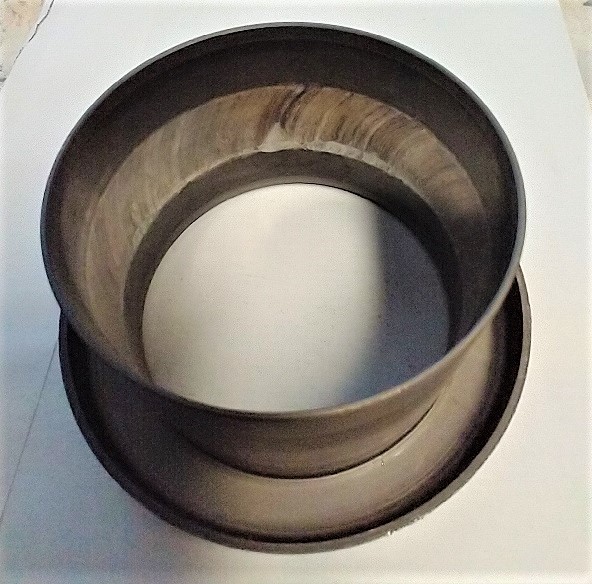 Kinda disappointed on the amount of wear on my seal collar, etc at only 11.5K miles, all new parts going in with better grease. |
|
  | |
zrx212
Silver Wing Expert

Number of posts : 580
Age : 65
Location : Ocala, FL
Points : 2023
Registration date : 2020-12-26
 |  Subject: Re: Driven Pulley Assembly Rebuild Subject: Re: Driven Pulley Assembly Rebuild  Sun Apr 04, 2021 5:57 pm Sun Apr 04, 2021 5:57 pm | |
| Received my parts yesterday (Saturday) around 2Pm from Ron Ayers, super prices !! Got everything installed and scooter back together, the parts to address the seal collar issue where $40(yellow), the bearing mod $15(red), went ahead and replaced most seals(they where heat hardened), rollers and sliders, etc, full clean and lube, etc. Kinda acp a full service, since I was in there, total spent in parts aprox $100. New belt and white spring inst. previously.Should be good for a long time, quick road test, runs excellent !!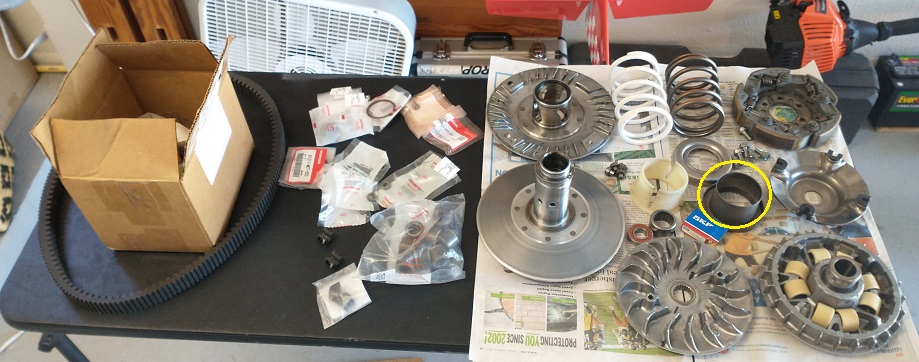   |
|
  | |
1Wingman1
Maxi-Scooter Rider

Number of posts : 126
Age : 82
Location : Jacksonville, Florida
Points : 4457
Registration date : 2013-01-19
 |  Subject: Driven pulley rebuild Subject: Driven pulley rebuild  Sun Oct 03, 2021 1:14 pm Sun Oct 03, 2021 1:14 pm | |
| Cosmic_Jumper said: Special tools are needed if the internal bearing in the driven pulley needs to be replaced.
To remove the circlip that retains the ball bearing I used long handled needle nose pliers that I believe that I got at Harbor Freight. They are about 11 inches long and fit through the needle bearing. The ends have to be modified with a grinder or a good file to fit the small holes in the circlip. Clear the grease out of the way, get oriented on the location of the small holes, and you just have to work blindly but a few minutes of searching should be rewarding. Once the circlip is out of the groove both bearings and the circlip can be driven out all together. I used the biggest socket turned backwards on an extension that would fit the hole on the ball bearing end and drove everything out. The ball bearing is slightly smaller than the needle bearing so it will offer no resistance when passing through the needle bearing land. The needle bearing was a quite tight fit and required some heavy pounding to remove. I elected to use a ball bearing that has seals on both sides for replacement. The circlip is easily pushed in until it seats in the groove. Very satisfying to solve a problem and probably saved about $80.
Since the needle bearing was such a tight fit I didn't want to tap the new one in for fear of some kind of damage. I tapped it lightly to start and align and then used a length of all thread with a large fender washer and nut on the ball bearing end and two appropriate sockets(one reversed inside the other) then a nut and washer to press the needle bearing in. It worked well and it was obvious that the fit was very tight. To handle the big clutch spring I made a tool with all thread and some scrap metals. I guess that I am a pack rat. |
|
  | |
ezed1
Scooter Rider

Number of posts : 35
Age : 63
Location : Huntsville AL
Points : 533
Registration date : 2023-07-28
 |  Subject: Re: Driven Pulley Assembly Rebuild Subject: Re: Driven Pulley Assembly Rebuild  Wed Nov 01, 2023 9:35 pm Wed Nov 01, 2023 9:35 pm | |
| - zrx212 wrote:
- Cosmic_Jumper wrote:
- zrx212 wrote:
- (Snip)
2. The grease that turns to wax in driven pulley cavity is useless IMO, I use exclusively Polyurea based grease on all cvt components requiring lube, Lucas X-Tra Heavy Duty(green) or John Deere SD(green) are widely availble and cheaper than any oem stuff.
3. The reason Honda removes the inner seal on the outer bearing to presumably use the cavity grease to keep it lubed is simply "DUMB" IMO. most scooters use a sealed bearing ??, a double sealed ball bearing of this size is very common(60032RS) and the load on this application is very minimal compared to wheel bearings, a quality brand bearing will have long life grease (Snip)
Devil’s Advocate here: What would be the advantage of “Green” grease in the DP? Wouldn’t “upgrading” to a new grease be a moot point if also changing to a sealed bearing?
I’ll be looking forward to you replacing that outer bearing. It’s a tedious job.
PSA, just for clarity for all, green just happens to be the color of the 2 samples of polyurea grease I referenced(both made by Lucas) color does not define formulation of grease in general, not a industry standard, read label. Polyurea based grease is OEM for a lot of high performance atv's, these of the shelf samples are just cheaper and widely available.
Ok, back on topic, yes installing a sealed bearing really negates the need for any grease in cavity IMO(sorry not correct see my later post), the needle bearing has seals to contain grease in it and the "rolled cup" design holds grease, just pack and forget, other areas like pin roller guides/grooves still need to be packed under seal collar.
KIM(PSA) that the 2 bearings on the inner sheave are only spinning/working when clutch is disengaged/idle, past "clutch in" point, the heavy lifting "per se" is done by the gearbox and cvt cover bigger bearings.
Yes installing those bearings could be a challenge, I have 2ea. on the way JIC, plus 35+ years of large aircraft maintenace helps(kinda explains me overstating things  ), I have a lot of capable tools, but I like to explore repair techniques that could be replicated by the average tinkerer !! ), I have a lot of capable tools, but I like to explore repair techniques that could be replicated by the average tinkerer !!
WKYP, will try to post pic of needle bearing/seals bearing seals bearing seals I know this is and old post But Good stuff in deed   , when i first took my clutch apart i saw two colors down in the clutch shaft ,some thick light colored grease along the walls half way down and where the pins where i saw a dark green grease ,at first i thought that light colored grease was a plastic sleeve of some sort until i pushed on it well i cleaned out as much of the old stuff as possible and have decided to use a Mobil 1 syn grease for everything after seeing this video https://youtu.be/ukBI1wtKOmo?si=vNVAI5BZ8BkpVDV9 and again thanks for the detailed post !!!!!!!!!! |
|
  | |
Loosemarbles
Site Admin

Number of posts : 1607
Age : 63
Location : South East England
Points : 4756
Registration date : 2016-10-01
 |  Subject: Re: Driven Pulley Assembly Rebuild Subject: Re: Driven Pulley Assembly Rebuild  Fri Nov 03, 2023 9:52 am Fri Nov 03, 2023 9:52 am | |
| This is what I found inside my pulley assembly:  Bear in mind this was at room temperature, it was like thick oil. Cross-contamination of greases over the years. I replaced with Shell Gadus S3 V220C 2. Been fine since. |
|
  | |
| | Driven Pulley Assembly Rebuild |  |
|
